

Recently, I had an assignment for my high school Spanish I class which required them to create a video. We were simulating TikTok videos (popular at the time this post was written and therefore a way to interject Instant Relevance to the assignment) and using the Google Slides template provided by Matt Miller of Ditch That Textbook. As this was our first attempt at this, my criteria for success were brief and simple:
- Create a video and insert it into the template provided
- Say one sentence in Spanish where you are telling the time (our current mastery objective)
- Make it funny.
That’s all I needed, and I envisioned this taking one class period.
Feel the sweat break on my brow
Having taught for many years, and this being my 24th year as a teacher, you would think that I would have known better. I didn’t. I forgot that teenage girls want their videos to be perfect, or funny, or perfectly funny. I did not forsee a problem with students recording video with their Chromebooks if they were unable to with their phones. I did not realize that some students would feel the need to write a script and use props. About 10 minutes into the assignment, however, it began to dawn on me.
Is it me or is it shadows that are
Students were loving the activity, even with the need for more class time in which to complete it. Some students asked if they could use TikTok to create their video, and then download it without putting it on their own TikTok account. Sure! I had been hoping that was doable, and it was/is. So, just like Snapchat, here’s another teenage addiction that can be used in education, without posting to their personal channels. But some students did not have the app. Or data. Or a phone (grounded, lost it, not allowed, etc). Solution? Chromebooks! It seemed like a great choice at the time.
Dancing on the walls
One of my top students in the class, a senior girl, asked me how she could take a video for the assignment without using her phone. She said that she had recorded one already using the video tool in Seesaw. This assignment, however, wasn’t in Seesaw, but Google Classroom, so I asked her to see if there was a way to download her video from Seesaw. There was, but she explained that the video did not fit the criteria provided, so she needed to reshoot it. “Was there a way to record a video with her Chromebook and not post in Seesaw?” she asked. I suggested using the Chromebook’s video camera to record it. That worked, but we hit a snag immediately. When my student downloaded the file, it was a webcam file type with the .webm extension, and that file type, among several others, is supported by Google Slides for inserting videos. However, on this particular day or with our particular student Chromebooks, it was not working for my student. For student privacy reasons or because they do not want their videos uploaded to YouTube, I needed to make the Google Drive option work. I also did not want to spend class time on students looking for extensions to use or online website converters. So, what to do?
Is this a dream or is it now
Enter Seesaw. Back to the original video that she recorded mistakenly on Seesaw, we realized that it downloaded from Seesaw as an .mp4 video file format. That format worked beautifully with our Google Drive to Google Slides integration. And just like that, we had a solution. Seesaw’s easy to use tools are available for student creation with or without an active assignment. When my student created her video on the Chromebook using Seesaw’s video recording tool, it was saved in the activity stream.
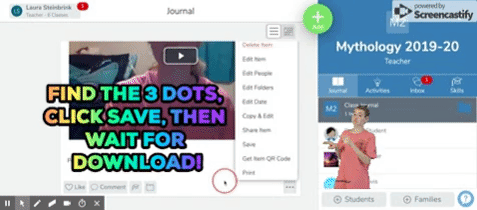
NOTE: Once videos are uploaded to Google Drive, students still need to make sure the share settings are set so that they can be viewed by others during the presentation.
Is this a vision or normality I see before my eyes
If you aren’t using Seesaw, you might want to give it a second, third, or even a fourth look. The audio tools are very easy for students to work with as well. Like the videos created and posted within Seesaw, the audio files can be downloaded once posted too. Students can easily create, post, then download the file, which is automatically in the .mp3 format. Here’s how to create one:
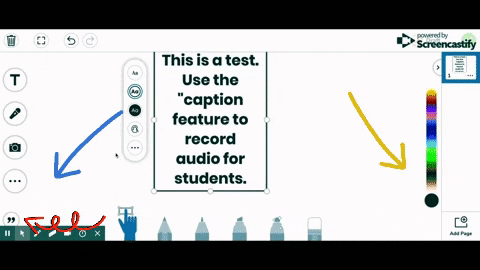
Once you have created the file you are happy with and have clicked the green check mark and posted the file (teachers can post as the anonymous student), then the fun begins!

I became a Seesaw fan the minute I began using it with students because of the ease that all students had when completing activities. This tech tool levels the field for the not so tech inclined student, and for that reason alone it should have a spot in your toolbox. But if it has escaped your radar so far, then you might want to recalibrate if you want an easy video or audio creation tool that allows the export of files in easy to use formats. Seesaw can save your students time and headaches. The price of free is also another check in the awesome column for this tool, as is the privacy for students and the variety of creation tools in one place. If you already use it, then try it as a creation tool apart from a place where you manage assignments. If you don’t already use it, then definitely give it a try and get students creating.
